Summary:
What is magic about colors is that you can select colors by using the Magic Wand or even by selecting a Color Range. We will also be discussing how to use the Quick Selection Tool. Along the way we will be showing you tips and tricks on how to expand or even subtract from a selection. We will walk you through what the inverse command is and how you can even reselect your last selection. In this Photoshop tutorial, we will also be discussing how to save/load selections. Throughout this course, we will also be passing along important keyboard shortcuts.
Currently we are using Windows Vista Home Premium 64 Bit and the Photoshop CS4 Extended 64 Bit version.
Knowledge You Need to Know:
If you are unfamiliar with certain areas that are not covered in this tutorial, feel free check out other tutorials on our website. We have many different types of tutorials that can be downloaded (Video, PDF) or viewed online that will train you for free! Once you have the knowledge, feel free to come back and go through this tutorial again.
Preparing For This Tutorial:
You will be using the Sky image which we have used in past tutorials. If you do not have this image, please scroll down to the “Click Picture To Download Supporting Files” and download the image. Please open the image DSC03562 in the Photoshop Program.
Magic Wand Tool:
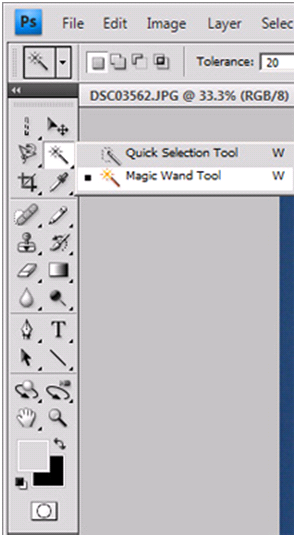
The “Magic Wand Tool” is an excellent choice for selecting an image if the colors are very similar in the color range. To use this tool, first Right click on the tool below the “Move Tool” (2nd tool from the top right hand side of a 2 column toolbox). Now Left click on the “Magic Wand Tool”.

Before we get using this tool, let’s go over some of the options of the “Magic Wand Tool” has to offer.
A). New Selection. Please refer to the tutorial called “Selecting Image Content” for more details. | |
B). Add Selection. Please refer to the tutorial called “Selecting Image Content” for more details. | |
| C). Subtract Selection. Please refer to the tutorial called “Selecting Image Content” for more details. | |
| D). Tolerance is the range it uses to sample colors. If you set this to a 1 it would only select the exact same color. If you change it to 255 (that is the maximum), then it will select a wide range of colors. | |
| E). Anti-Alias allows you to smooth the selection which will make it less jagged. Make sure this box is selected (by default it is always on). | |
F). Contiguous means that it will look for similar colors that are right next to that pixel. If it finds a similar color, it will look next to that pixel and so on until it does not find a match. If you uncheck “Contiguous” it will use the whole image to select similar colors. | |
G). Even though we have not discussed layers yet (that is coming soon); if you select “Sample All Layers”, it would try to find and sample all of the layers. For now leave this unchecked. | |
| H). Refine Edges. Please refer to the tutorial called “Selecting Image Content” for more details. |

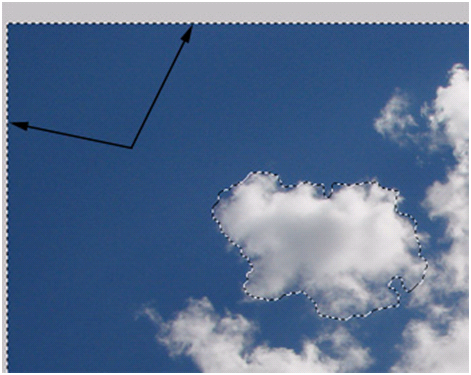
On this example, change the “Tolerance” value to 20. Left click on the box and enter the value. Make sure the “Anti-Alias” and “Contiguous” are selected. Please note – the “Tolerance” will be different if you are using another picture besides the sample that we have supplied. On this example, we would like you to move your mouse pointer to the top right hand side of the image. Left click on the center of the top right hand corner of the small cloud. Photoshop Tip – Just like the other selection tools we have discussed, you can hold down the “Shift” key when you would like to add to a selection or use the ALT key to subtract from a selection once you have made the initial selection.
As you can see on the image below, it does a good job (not a great job) at selecting the cloud. You could either fine tune the tolerance to select more of the cloud or once it has been selected, you can use the “Shift” key while clicking on parts of the cloud that it is not selected.

Quick Selection Tool:
The “Quick Selection Tool” is located in the same location as the “Magic Wand Tool”. When you are ready, Right click on the toolbox tool and Left click on the “Quick Selection Tool”. The reason why we showed you this tool after the “Magic Wand Tool” is because it is similar to the “Magic Wand Tool” and the “Magnetic Lasso Tool” (please refer to the “Selecting Image Content” tutorial). This tool tries to find similar colors and tries to find the edges. Overall this tool does a pretty good job at making the selection.

On this example, find the smaller cloud located on the left hand side. Hold down the Left mouse button and drag around the edges. Release the Left mouse button when you are finished. Remember it does not have to be perfect and we will fix the small errors next. You will notice it might not be perfect. What we want you to do is after you made the initial selection is to use the “Shift” key to add to certain areas of the selection or use the ALT key to subtract from the selection. By using the shortcut keys, we have modified the initial selection and end result is the selection below. Please note, if you really want to get a detailed selection, Zoom into the cloud (please refer to the “Zoom And Panning” tutorial).

You will notice that there are a few different options in the toolbar for the “Quick Selection Tool”.
A). New Selection. Please refer to the tutorial called “Selecting Image Content” for more details. | |
B). Add Selection. Please refer to the tutorial called “Selecting Image Content” for more details. | |
| C). Subtract Selection. Please refer to the tutorial called “Selecting Image Content” for more details. | |
| D). You can change the brush size (Refer to “Colors And Painting Tools” tutorial) or you can use the keyboard shortcut of “[“ (reduce brush size) or “]” (increase brush size). | |
| E). Even though we have not discussed layers yet (that is coming soon), if you select “Sample All Layers”, it will try to sample all of the layers. For now leave this unchecked. | |
F). “Auto-Enhance” - Enhances the edge of the selection. | |
G). Refine Edges. Please refer to the tutorial called “Selecting Image Content” for more details. |

Color Range:
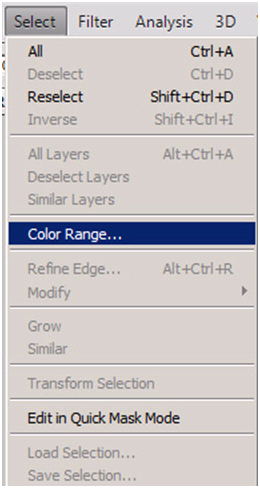
Another way to make a selection is by using the “Color Range” command. Next to the “Filter” menu, you will find the “Select” menu. Left click on the “Select” menu and Left click on the “Color Range…” command.

Here are the important options in the “Color Range…”.
A). Fuzziness – Hold down your Left mouse button and drag the slider left or right (or you can Left click on the text box and enter a numeric value. This value tells Photoshop how far beyond the point do you want it to sample the color range. | |
B). Left click on any area of the image that you would like to sample. | |
| C). Use this option to select 1 color range. | |
| D). Use this eye dropper option to add to a color range. | |
| E). Use this option to subtract from the color range. | |
F). When you are finished, Left click the “OK” button. If you are not happy with the color range, Left click on the “Cancel” button. |

Mix and Match Selection Tools:
You are not constrained to using only 1 tool to make your selection. Example: You could use the “Rectangular Marquee Tool” to make a basic square selection. Once it is selected you can use the “Color Range” command to select the specific colors within the current selection. Just remember for all of the selection tools once you make the selection, you can modify that selection by holding down the “Shift” key to add to the selection or ALT key to subtract from the selection. Usually there will not be one tool that makes the perfect selection and you will need to look at the image and determine what tool is best for your project.
Of course, practice, practice, and practice. Take an image that you have stored on your computer or from the web and pick an area to remove. Maybe you have a picture of a family member and maybe you want to try your luck with “Head Replacement”.
Inverse:
One option that can be very useful with any selection tool is the “Inverse” command. Sometimes it is easier to tell Photoshop what you do not want selected versus what you want selected. On this example make sure you have the small cloud selected. Before you proceed, we would like you to look at this selection; you will notice only the small cloud is selected. Next to the “Filter” menu, you will find the “Select” menu. Left click on the “Select” menu and Left click on the “Inverse” command.

You will now notice you will have “Marching Ants” around the outside of the image. Because you inversed the selection, you are telling Photoshop that you want everything but the small cloud. If you used the “Inverse” command again, it will reselect the small cloud.

Other Important Select Commands:
There are 3 additional important “Select” commands that we would like to explain to you. All of these commands are located in the “Select” menu.
A). If you want to select the whole image, Left click this command. Photoshop Tip – CTRL-“A” is the keyboard shortcut and we highly recommend that you learn this shortcut. | |
B). As we explained in a previous tutorial, you can deselect a selection by using the CTRL-“D” or you can Left click on “Deselect”. | |
| C). The “Reselect” will select the last selection you made. The beauty of this command is that if you made a selection and used other tools you can always come back and do a “Reselect” to select your last selection. The reason why it is grayed out in this picture below is because when you have something already selected, you can’t do a “Reselect”. For this example, use CTRL-“D” to deselect the image and you will then be able to use the “Reselect” command. |

Saving And Loading Selections:
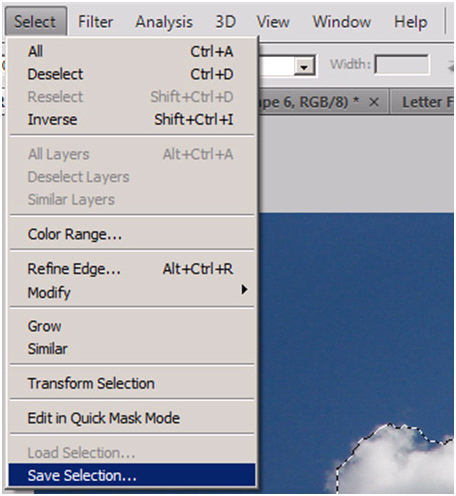
One of the nice features of Photoshop is that once you make a selection that you can save it and load it later. We try to save most of our selections because we never know when we might need to rework a certain area of the image. Once you have a selection, Left click on the “Select” menu and Left click on the “Save Selection…” command.

Now you will see a dialog box.
A). Left click on the “Name” text box and enter a detailed name for the selection. | |
B). We will not be discussing channels at this time, but make sure the “Operation” is set to “New Channel”. We just want you to know that it is saving the selection in a “Channel”. | |
| C). When you are finished, Left click the “OK” button. If you are not happy with the selection, Left click the “Cancel” button. |

We want to prove to you that it is loading the selection, so please use CTRL-“D” to deselect the current selection. Please note, in the normal world, you would not need to deselect the current selection. We are only having you do this because we want to show you that it loads the selection.
To use a previously saved selection, Left click on the “Select” menu and Left click on the “Load Selection…” command.

Here are the few key options with the “Load Selection” screen.
A). Left click the drop down box to select your saved selection. Remember you can save as many selections as you would like. | |
B). If you have another selection on the screen while loading a selection, it will give you a few options such as “New Selection” (disregard the other selection when loading) or even “Add to Selection” or even “Subtract from Selection”. | |
| C). When you are finished, Left click on the “OK” button. If do not want to load this selection, Left click on the “Cancel” button. |

This concludes this tutorial on the “Quick Selection Tool”, “Magic Wand Tool”, “Color Range”. While going through this tutorial you should have learned how to save/loagd selections, plus how to use the Inverse command and other “Select” options. We hope you enjoyed this tutorial and we recommend that you take the 10 question quiz below and if you have time, check out another tutorial. Remember, all tutorials on our site are Free!
Quiz
1). How do you use the “Quick Selection Tool”?
A). First select the tolerance and then select a pixel. | |
B). Use the eye dropper to select your color and then Left click the “OK” button. | |
| C). Use a brush to paint your selection. | |
| D). Draw a rectangular box to make your selection. |
2). In the “Color Range” command what is one way to select a color?
A). On the dialog box enter the numeric value of the color. | |
B). Use the eye dropper tool to select the color from the image. | |
| C). Left click on the “Select Colors” button to select the colors. | |
| D). Left click on the “Color Selection” button to select the colors. |
3). How do you Save a selection?
A). Create your selection and then use the “Edit” menu and then “Save Selection”. | |
B). Create your selection and use the “Save Selections” button. | |
| C). Create your selection and then go to the “File” menu and then “Save”. | |
| D). Create your selection and then use the “Select” menu and then “Save Selection”. |
4). What command would you use if you wanted to reselect the last selection?
A). Reselect. | |
B). Selection Undo. | |
| C). Select Subtract. | |
| D). Select. |
5). Besides CTRL-“D” what is another way to deselect a selection?
A). From the “Edit” menu, Left click “Deselect”. | |
B). Left click the “Deselect” checkbox in the selection. | |
| C). Left click the circle with a line through it. | |
| D). From the “Select” menu, Left click “Deselect”. |
6). What is the keyboard shortcut to subtract from a selection for any selection tool?
A). “Shift”. | |
B). ALT. | |
| C). CTRL-“A”. | |
| D). ALT-“A”. |
7). The Inverse command in the “Select” menu does what?
A). It inverses the image picture. | |
B). It reselects the last selection. | |
| C). It inverses the current selection. | |
| D). It reverts back one step in history. |
8). How do you mix and match selection tools?
A). Make your first selection and then select another selection tool and either add or subtract from the selection. | |
B). Make your first selection and then turn on the “Mix” checkbox and then use a different tool. | |
| C). You can only mix and match if you save the current selection. | |
| D). Make your first selection and then select another selection tool. |
9). A selection is saved as a?
A). Layer. | |
B). Channel. | |
| C). Favorite. | |
| D). Action. |
10). The “Magic Wand” is primarily used when?
A). When you have a wide range of colors. | |
B). When you want to select a rectangular shape. | |
| C). When you are trying to select similar colors. | |
| D). When you want to draw around the edges. |
Answers: 1). C, 2). B, 3). D, 4). A, 5). D, 6). B, 7). C, 8). A, 9). B, 10). C
Scoring:
0 - 5 = Please review the video tutorial and re-read this document either offline (PDF) or online.
6 – 8 = We would recommend that you print this document off and read it at a later time.
9 – 10 = Congratulations you have passed the quiz. Go ahead and view another tutorial on our site.
We hope you enjoyed this detailed tutorial. Please visit us at: http://www.Photoshopeducation.blogspot.com to expand your knowledge within Adobe Photoshop.

Click Picture To Download Video File To View Offline
Download Total Video Player, iTinySoft

Click Picture To Download PDF Tutorial
Download Adobe Reader, Adobe Corporation
Click Picture To Download Supporting Files
(Brushes, Textures, Fonts, Images, Actions, .PSD, Etc.)
Download ZipGenius Standard Edition 6.0.3.1150, Dicono di ZipGenius


0 comments:
Post a Comment