You are about to tackle one of the tougher tools within Photoshop, the Pen Tool. Because we are a beginner/intermediate site, today we are just going to go over the basics of how to use the Pen Tool to make a selection. Back in the
Text Features tutorial, we showed you how to type on a Path and you created the Path using the Pen Tool. Today we take you 1 step closer to learning this feared tool.
Currently we are using Windows Vista Home Premium 64 Bit and the Photoshop CS4 Extended 64 Bit version.
Knowledge You Need to Know:
If you are unfamiliar with certain areas that are not covered in this tutorial, feel free check out other tutorials on our website. We have many different types of tutorials that can be downloaded (Video, PDF) or viewed online that will train you for free! Once you have the knowledge, feel free to come back and go through this tutorial again.
Preparing For This Tutorial:
Open the PE-IMAGE.jpg. This should have 2 different objects in the image. If you do not have this image, please use the “Download Supporting Files” option located on the bottom of the tutorial.
Why More Of The Pen Tool Features Now?:
We debated if we should show you more o the Pen tool and we agreed that it was time to show you a little bit more about the Pen tool, but limit it to making selections. Back in Text Features tutorial we showed you how to use the Pen tool to type on a path. Today, we will show you how to make a selection. Due to the fact we have showed you the other ways to select an image, we felt before we take the next step into another subject, that we should show you how to select with the Pen Tool. In the future, we will show even more features of this tool.
Terminology:
We truly do not want to overload you with Pen terminology in this tutorial, so we are just going to teach you 2 new terms. When you see dots (either a white or gray dot) at the end of the line, these are called “Anchors”.
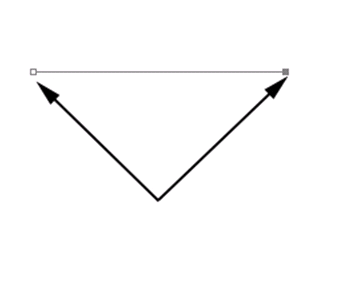
The next term is “Segments”. Basically a segment is the line in between the anchors.

Straight Line Selection:
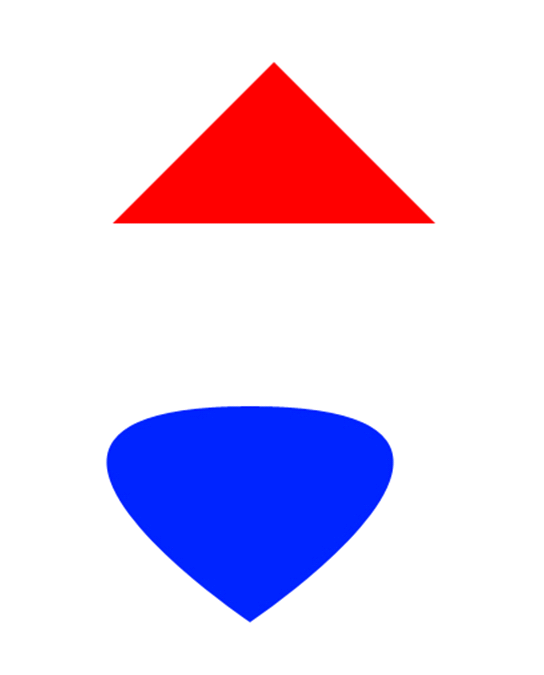
Let’s show you how to do a straight line selection. This is by far the easiest to understand. Our goal here is to make a triangle selection around the red triangle in the image. Please make sure you have the PE-IMAGE.jpg opened.
In the toolbox, towards the middle left hand side on a 2 column toolbox, you will find the Pen Tool image. Right click this image and Left click the “Pen Tool” command. Photoshop Tip - To use the keyboard shortcut, press the “P” key.

Our first goal is to make a selection around the triangle using the Pen Tool. You should now have the following image open.
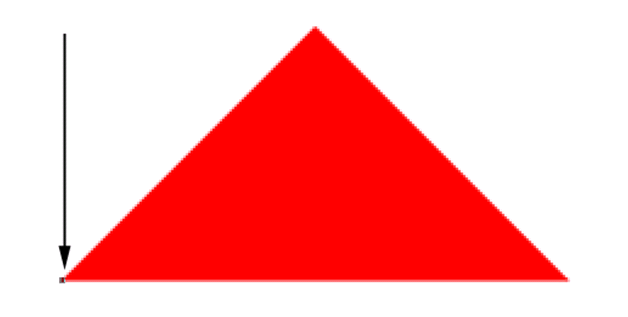
On the bottom left hand side of the triangle, single Left click the corner. You should see an anchor (dot) will be displayed.
Now hold down the “Shift” key (this forces it to be a straight line) and single Left click the second point which is the bottom right hand corner of the triangle.

Now onto the 3rd anchor which is at the top of the triangle. Hold down the “Shift” key and single Left click to create the top anchor.

Move your mouse to the starting anchor, and you will notice the Pen Tool will change. It will show the Pen Tool and it will have “o” to the right of it. Single Left click the starting anchor, while holding the “Shift” key.

Now you need to tell Photoshop that your anchor points are for a selection. Right click while using the Pen Tool and Left click “Make Selection”.

You will then see a “Make Selection” dialog box will be displayed.
| | A). If you want to blur the edges, Left click this box and enter a value. For this tutorial, please use 0. |
| | B). Anti-aliased when checked allows Photoshop to smooth the edges of the selection. On this example, please make sure this box is checked. |
| | C). If you are happy with your changes, Left click the “OK” button and if you want to make changes to the selection, Left click the “Cancel” button. |

You will know see the area is selected and the marching ants will be displayed. See the Pen Tool is not that bad! The key to learning the Pen Tool is to break it up into different sections and not to bombard you will a lot of information or terminology at once.

Curved Selection:
Now it is time to use the Pen Tool to select the bottom shape in the image. Before you proceed, please use CTRL-“D” to deselect the triangle. It is very important to read each step very carefully. Start of by using the Pen Tool and single Left click the bottom point of the object. You will see a new anchor will be added.

Now, please read this section very carefully!
| | A). Hold down the “Shift” key on the keyboard and Left click and HOLD the mouse button for the 2nd anchor point (anchor should be in the top center of the object). |
| | B). Your still holding the Left mouse button, right? If not, do a CTRL-“Z” to undo. We want you to drag the mouse to the right first. You should see it to begin to curve. Move the mouse up and down and left and right to align the curve. Now release the Left mouse button. |

There are 2 ways to finish this with the Pen Tool. 1). Left click the starting anchor and use A) and B) from above or 2). Single Left click the starting anchor (this is much easier to do, but it will not allow you change the curve).

Now follow the instructions above to “Make Selection” (Right click, select “Make Selection”).
Conclusion:
You may be wondering, what are the other options in the Pen area of the toolbox. Let’s not worry about those other tools for now. It is very important to teach you the Pen Tool in stages. Remember, back in the Text Features tutorial we showed you how to use the Pen Tool and to type on a Path and now you know how to make a straight and a curved selection. In time you will learn more terminology and more features of the Pen Tool.
Some people might be disappointed that we did not show you everything about the Pen Tool, but from our experience, if a beginner user is showed everything about the Pen Tool, most of the beginner/intermediate users become frustrated with the tool. End result these users will never use the Pen Tool ever again, even though the Pen is a powerful tool within the Photoshop program.
Are you itching to learn more about the Pen tool? Well first let’s make sure you truly understand how to curve or how to make a selection. One recommendation is that you download an image that is round (an apple, or a Frisbee, etc.) and try to make the selection off of those images.

1). How do you make a straight line with the Pen tool?
| | A). Hold down the CTRL key while single Left clicking the next point. |
| | B). Hold down the ALT key while single Left clicking the next point. |
| | C). Hold down the “FN” key while single Left clicking the next point. |
| | D). Hold down the “Shift” key while single Left clicking the next point. |
2). When you Left click a spot with the Pen Tool it creates a dot or a point which is actually called a?
| | A). Segment. |
| | B). Anchor. |
| | C). Curvature Point. |
| | D). Handle. |
3). When you are about ready to Left click the starting point after you have made at least 2 points, what does the pointer change to?
| | A). Shows Pen Tool with a “+” to the right of it. |
| | B). Shows Pen Tool with a “-“ to the right of it. |
| | C). Shows Pen Tool with a “o” to the right of it. |
| | D). Shows Pen Tool with a “)” to the right of it. |
4). After you have Left clicked the starting point, how do you tell Photoshop to make it a selection?
| | A). Right click with the Pen Tool and Left click “Make Selection”. |
| | B). Right click with the Pen Tool and Left click “Create Selection”. |
| | C). In the Layers palette, select the “Selection” icon. |
| | D). Drag the selection to the Layers palette and it automatically creates a selection. |
5). What does “Feather Radius” mean in the make selection dialog box?
| | A). It will draw feathers of a bird around the edges. |
| | B). It creates a smooth edge to the selection. |
| | C). It creates a blur to the edge. |
| | D). It increases the selection by X amount of pixels, so it can create a larger selection. |
6). What does the Anti-aliased do in the make selection dialog box?
| | A). It adds a watermark (copyright) to the image. |
| | B). It adds a blur to the edges. |
| | C). It forces Photoshop to resample the selection and it does a better job at selecting the edges. |
| | D). It smoothes the edges of the selection. |
7). What is it terminology called in between the anchors?
| | A). Line. |
| | B). Selection. |
| | C). Segments. |
| | D). Pen Line. |
8). How do you create a curved line with the Pen Tool?
| | A). Right click the next point. |
| | B).Single Left click the next point and then hold down the “Shift” key to curve the line. |
| | C). Double Left click the next point and then select “Curve” from the dialog box. |
| | D). When Left clicking the next point, hold down the Left mouse button and drag up or down or left or right. |
9). If you make an error, what is the easiest way to go back one step?
| | A). CTRL-“Z”. |
| | B). CTRL-“U”. |
| | C). ALT-“U”. |
| | D). “Z”. |
10). What is the keyboard shortcut to use the last active Pen Tool?
| | A). CTRL-“P”. |
| | B). “P”. |
| | C). ALT-“P”. |
| | D). CTRL-ALT-“P”. |
Answers: 1). D, 2). B, 3). C, 4). A, 5). C, 6). D, 7). C, 8). D, 9). A, 10). B
Scoring:
0 - 5 = Please review the video tutorial and re-read this document either offline (PDF) or online.
6 – 8 = We would recommend that you print this document off and read it at a later time.
9 – 10 = Congratulations you have passed the quiz. Go ahead and view another tutorial on our site.
We hope you enjoyed this detailed tutorial. Please visit us at: http://www.Photoshopeducation.blogspot.com to expand your knowledge within Adobe Photoshop.

Click Picture To Download Video File To View Offline
Download Total Video Player, iTinySoft
 Click Picture To Download PDF Tutorial
Download Adobe Reader, Adobe Corporation 
Click Picture To Download Supporting Files
(Brushes, Textures, Fonts, Images, Actions, .PSD, Etc.)
Download ZipGenius Standard Edition 6.0.3.1150, Dicono di ZipGenius
Summary:
We have now gone over the basics of masking, let’s take this tutorial and add on to your knowledge and learn more basic functions of Layer Masks. In this tutorial we will be showing you another way to copy from one image to another image. We will show you a quicker way to create a Layer Mask and how to disable/enable the Layer Mask. In the past, we have explained how to crop a full image and in today’s course we will show you how you can crop a layer. Finally the reveal all versus hide all will be explained.
Currently we are using Windows Vista Home Premium 64 Bit and the Photoshop CS4 Extended 64 Bit version.
Knowledge You Need to Know:
If you are unfamiliar with certain areas that are not covered in this tutorial, feel free check out other tutorials on our website. We have many different types of tutorials that can be downloaded (Video, PDF) or viewed online that will train you for free! Once you have the knowledge, feel free to come back and go through this tutorial again.
Preparing For This Tutorial:
You will be using 2 images in this tutorial (a picture of a sky and a Disney sign) If you do not have these images, please scroll down to the “Click Picture To Download Supporting Files” and download the images. Please open the image DSC03562 and PE-DISNEY in the Photoshop Program. **Even though every layer palette screen shot does not show it, we highly recommend that you always duplicate the background layer when you begin a project.
Before We Begin:
Before we begin, you will need to shrink the image size of the sky picture to a width of 1680. If you are unfamiliar how to shrink images, please review the Canvas Size, Cropping, Image Size tutorial. We have shown you how to copy from one image file to another image file, but here is even a quicker way to get both the sky photo and the sign image within the same file. Within the Sky image, use CTRL-“A” to select all and then use CTRL-“C” to copy. Now Left click on the sign image file tab and use CTRL-“V” to paste. Your layers should look like the following:

The Easy Way To Layer Mask:
Sometimes it is easier to look at the layer below and determine what you would like to reveal then it is trying to guess what is underneath the layer. The following is an excellent trick to do layer masking! We would like to replace the current sky with the sky image and make it look like it was part of the image. Yes, the perspective will not be perfect and if you searched the web you could find a perfect perspective of a sky photo, but for now this example is to show you an easy way to mask.
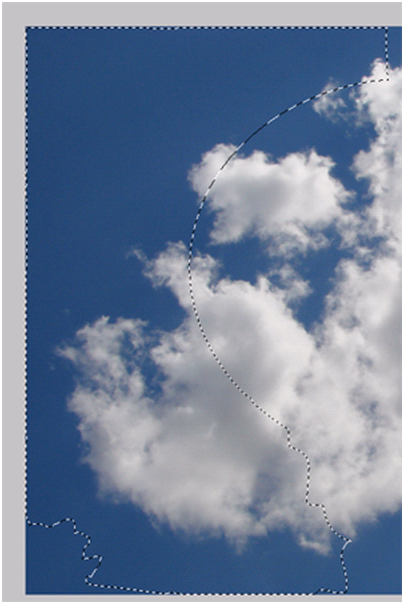
First start off by hiding the sky layer. Next, Left click the Disney layer. Now it is time to use all of your selection knowledge which you learned in the Selecting Image Content tutorial and select the current sky. On this example we did a quick selection with the magnetic lasso tool and selected only the left hand side of the sky.

Now unhide the sky layer and Left click the layer to make it active. You should see something similar to the following.
In the last tutorial we talked about one way to create a Layer Mask, let’s show you even a quicker way. First, select (Left click) the sky layer. In the layers palette, Left click the 3rd button on the bottom from the left hand side. The icon has a white circle and a gray box around it.

You will notice it created the layer mask and the beauty of doing the process this way is you can do a quick rough draft and even if you make errors with the selection tool, you can still use the brush with the black and white colors to fine tune it. Example: We would use the black and hide the tree in the bottom left hand corner because you can see the rough edges.

Disable/Enable Layer Masks:
Sometimes you may want to see what the original looks like without the layer mask. You can disable the layer (does not delete it and will show you it unmasked).
| | A). Right click the Layer Mask image box. |
| | B). Left click the Layer Mask. |

You will now notice a red X through the Layer Mask and the actual image will show you the unmasked version of that layer.

To enable the mask, Right click on the layer mask image and Left click the “Enable Layer Mask” command.

Cropping A Layer Only With Masks:
We have shown you how to crop a total image, now it is time to crop only the layer with a Layer Mask. **Close down both images (sky and Disney). Now open the sky image again. Duplicate the background layer (CTRL-“J”). Even though we did not duplicate the background layer above, we want you to get into a habit on duplicating the layer because you will always then have an original. Ok, create a new blank layer and move that layer in between the background layer and the sky photo. Finally, hide the background layer. Your layer palette should look like this (ignore the layer names, but pay attention to the order and that the background layer is hidden).
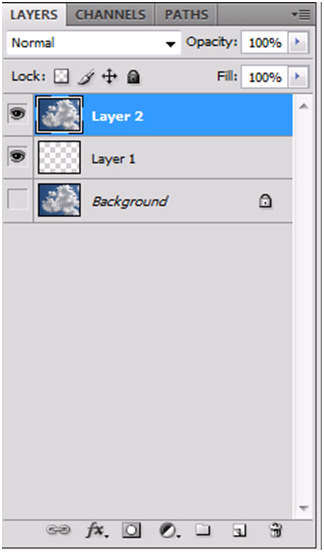
Now use any of the selection tools (we used the Marquee Tool) make your selection. In this example you are telling Photoshop that you want to hide anything outside the selection.

Now add a Layer Mask to the sky photo (top layer). End result, you just cropped the layer (not the total image).

Reveal All Versus Hide All :
**Delete the current Layer Mask. If you need information how to delete the Layer Mask, please review the Masking And Transform Information tutorial. So what is the difference between the reveal all and hide all. Every time you have created a Layer Mask (including the previous tutorial), you have directly or indirectly did a Reveal All. This means it will start off the layer by showing you all the contents of the Layer and to mask you hide by using the black color. If you select Hide All, it will hide all of the image content and you would have to use a white color to unhide the image content. Most people will only use the reveal all!
On the example below to show you what Hide All does, we first selected (Left clicked) the sky layer (top layer) and then went into the Layer menu and then moved our mouse to the Layer Mask and then selected the Hide All command.
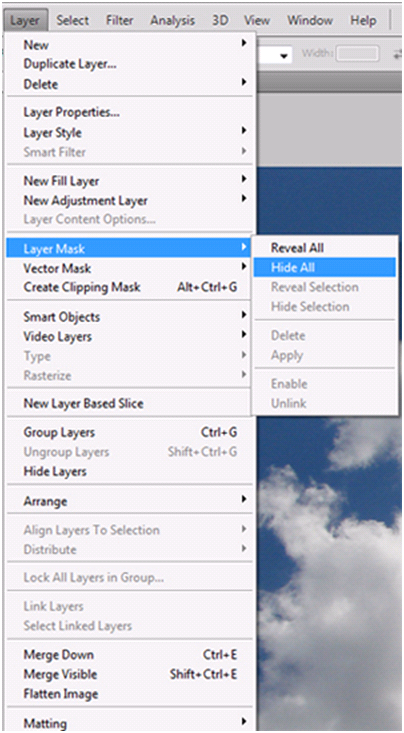
You will notice that the sky image is no longer displayed. To reveal the sky image, you would need to use the white paintbrush on the canvas. The second area you should notice is the Layer Mask image in the layer palette is all black, meaning that the whole image hidden.

So now you know how to hide all through the Layer menu, how do you use the “Add Layer Mask” icon in the layers palette to hide all? Hold down the ALT key while Left clicking the icon in the layers palette. If you have forgotten what the icon looked like, please refer to the section called “The Easy Way To Layer Mask”.
Conclusion:
Between the 2 tutorials on masking you should have more than enough knowledge to use the basics of masking. In this tutorial, you should of learned how to easily layer mask, what is a reveal all, how to disable a layer mask, how to crop a layer with layer mask and we showed you a quick trick to copy from one image to another image.
Please take a few minutes and answer the 10 question quiz below to see how well you remember your new knowledge you have learned from this course.
1). What is the other way we showed you how to copy one image to another image?
| | A). Select the first image and use keyboard shortcuts, CTRL-“B”, CTRL-“C”, change to the target image and use CTRL-“V”. |
| | B). Select the first image and use keyboard shortcuts, CTRL-“C”, CTRL-“A”, change to the target image and use CTRL-“V”. |
| | C). Select the first image and use keyboard shortcuts, CTRL-“A”, CTRL-“C”, change to the target image and use CTRL-“V”. |
| | D). ). Select the first image and use keyboard shortcuts, CTRL-“V”, CTRL-“C”, change the to target image and use CTRL-“A”. |
2). How do you disable a Layer Mask?
| | A). Right click the layer mask in the layer palette and Left click “Disregard Layer Mask”. |
| | B). Right click the layer mask in the layer palette and Left click “Disable Layer Mask”. |
| | C). Left click the layer mask in the layer palette and then click the “Disable Layer Mask” button. |
| | D). Left click the layer mask in the layer palette and Left click the “Disable Layer Mask” command. |
3). Using the Add Layer Mask icon in the layers palette, how do you make it to “Hide All”?
| | A). Hold down the “Shift” key and Left click the icon. |
| | B). Hold down the CTRL key and Left click the icon. |
| | C). Drag the icon to the “Hide All” button. |
| | D). Hold down the ALT key and Left click the icon. |
4). How do you crop only a portion of a layer?
| | A). Make your selection and add a Layer Mask. |
| | B). From the “Edit” menu select “Crop” and then select “Only Layer”. |
| | C). Left click the Layer Mask and then Left click the “Crop” icon. |
| | D). You can only crop the complete image and not the layer. |
5). What habit should you get use to when you open an image and before you begin modifying?
| | A). Change the actual image size, so it is smaller in size. |
| | B). Duplicate the background layer and hide the background layer. |
| | C). You should always do your color corrections before using layer masks. |
| | D). When you open either a JPG or a GIF file, you should always make sure you have the layers in order from top to bottom. |
6). The button to “Add a layer mask” is on the bottom of the layers palette, but what location?
| | A). It is the 3rd icon from the right hand side. |
| | B). It is the 2nd icon from the right hand side. |
| | C). It is the 2nd icon from the left hand side. |
| | D). It is the 3rd icon from the left hand side. |
7). If you see the layer mask image is filled with the color black, what does that mean?
| | A). It means the complete layer image is hidden. |
| | B). It means the complete layer image is revealed. |
| | C). It means the layer mask is disabled. |
| | D). It means the layer mask is locked. |
8). How can you tell a layer mask is disabled?
| | A). In the layers palette it will gray out the layer mask. |
| | B). From the “Layer” menu, the layer mask command will show “Disabled”. |
| | C). A red X will be in the layer mask image. |
| | D). The layer mask image will change to the word “Disabled”. |
9). When you use a color black on a layer mask, what does that do?
| | A). It will paint black on the image. |
| | B). It allows you to unhide that portion of the image. |
| | C). It allows you to hide that portion of the image. |
| | D). When you are done painting it in black, Left click the layer mask to apply the layer mask. |
10). From the menu (not the layer palette), how do you get to the “Hide All” command for the Layer?
| | A). From the Layer menu, hover over masking and then select “Hide All” command. |
| | B). From the Layer menu, hover over layer mask and then select “Hide All” command. |
| | C). From the Layer menu, Left click the “Hide All” command. |
| | D). From the Layer menu, Left click “Masking” and then from the dialog box, Left click the “Hide All” command. |
Answers: 1). C, 2). B, 3). D, 4). A, 5). B, 6). D, 7). A, 8). C, 9). C, 10). B
Scoring:
0 - 5 = Please review the video tutorial and re-read this document either offline (PDF) or online.
6 – 8 = We would recommend that you print this document off and read it at a later time.
9 – 10 = Congratulations you have passed the quiz. Go ahead and view another tutorial on our site.
We hope you enjoyed this detailed tutorial. Please visit us at: http://www.Photoshopeducation.blogspot.com to expand your knowledge within Adobe Photoshop.
Click Picture To Download Video File To View Offline
Download Total Video Player, iTinySoft
Click Picture To Download PDF Tutorial
Download Adobe Reader, Adobe Corporation
Click Picture To Download Supporting Files
(Brushes, Textures, Fonts, Images, Actions, .PSD, Etc.)
Download ZipGenius Standard Edition 6.0.3.1150, Dicono di ZipGenius
Summary:
In this tutorial we will walk you through even more of the Layer options. In the first tutorial called Learning Layers With Ease we showed you the basics of Layers and now it is time to expand your knowledge by explaining how to create a new blank layer (2 different methods) to attaching a color identifier to a layer. We will even explain how to copy a layer from one image and add it to another image. Finally we will discuss how to group layers and what is the “Flatten Image” option.
Currently we are using Windows Vista Home Premium 64 Bit and the Photoshop CS4 Extended 64 Bit version.
Knowledge You Need to Know:
If you are unfamiliar with certain areas that are not covered in this tutorial, feel free check out other tutorials on our website. We have many different types of tutorials that can be downloaded (Video, PDF) or viewed online that will train you for free! Once you have the knowledge, feel free to come back and go through this tutorial again.
Preparing For This Tutorial:
You will be using the Sky image which we have used in past tutorials. If you do not have this image, please scroll down to the “Click Picture To Download Supporting Files” and download the image.
Creating A New Layer:
Before we begin with the tutorial, please create an 800X800 new document. In the Learning Layers With Ease tutorial we used the ellipse tool to create new layers, but what if you wanted to create a new blank layer? We will be showing you 2 ways to create a new blank layer. The first method is to Left click the “Layer” menu and move your cursor to “New” and then Left click the “Layer…” command.

This first method allows you to customize your layer, while the second method just creates a new layer.
| | A). Left click in the “Name” text box and type a name for the Layer. |
| | B). If you would like to identify the layer with a color, Left click the drop down box and Left click a color. |
| | C). In the previous tutorial we explained about Opacity. Left click the box to change the opacity. |
| | D). If your happy with the creation, Left click the “OK” button and if you want to back out of the screen without creating a new layer, Left click the “Cancel” button. |

On our example you will notice the “Red” over the eye because we changed the color identifier for the layer to red in the previous screen. You will also notice it used the “Name” for the name of the layer.

Another method to create a new layer is to Left click the new layer button which is located to the left of the trashcan icon in the layers palette. You will see this only creates a layer and does not allow you to change the opacity, color identifier, or even the name when you are creating the layer.

Change Color Of A Layer:
As we showed you, you can have a color identifier when you use method 1 of creating a new layer, but what if you wanted to add a color identifier or change a color after the fact.
| | A). Right click (do not Left click) the “Eye” image that you want to change. |
| | B). Now Left click the color name. |

As you can see we changed “Layer 1” to be a blue identifier. Photoshop Tip – If you would like to change an existing color identifier, Right click on the “Eye” and Left click a new color name.

Copying Layers From One Image Into A New Image:
Sometimes you want to copy a layer from one image and add it to a second image. There are a few ways to copy layers from other images, but at this time we would like to show you an easy way to copy a layer into a different image layer. Create a new document that is 3000X2000 in size. Now add a layer of text. Make the text very large 200+ font size and make the color a red or something that will stand out (not blue or white). Now open the sky image (if you do not have this image, please scroll to the bottom of the post and Left click the download supporting files option).
Now Left click the “Window” menu and move your cursor to the “Arrange” option and you will see a new sub-menu displayed. Left click the “Tile” command.

You should see a similar screen to the one below (please note, yours could be reversed meaning that the text is on the right hand side). We would like you to Left click the tab in the window of the text. You will notice your palette will show the “T” for text displayed (you should not be seeing the image of the cloud in the palette).

First, Left click the text in the layers palette to select the layer. Now hold down the Left mouse button and drag it to the sky picture. Release the Left mouse when you are happy with your placement on the image. Congratulation, you just copied from one image layer to another image layer on a different file. Photoshop Tip – You can also copy layers by CTRL clicking the image box in the layer and then using CTRL-“C” to copy and then switch to the second image and do a CTRL-“V” to paste.

Grouping Layers:
If you are working with a large amount of Layers you can create groups to store your Layers. Let’s say you have an image of a person and 10 of the layers are strictly with the face, then we would recommend that you create a group for the face. When you need to use the group you can expand it to see all the layers and when you are not using it, you can collapse the group.
To create a new group, Left click the New Group button located to the Left of the New Layer button in the Layers palette.

You should now see a folder image and the word “Group 1”. To add to the group, Left click the layer to select it and hold down the Left mouse button and drag it to “Group 1”. Release your Left mouse button when you are hovered over the “Group 1”.

To expand or collapse the group, Left click either the right arrow (shown in image below) to expand or the down arrow to collapse. To remove Layers from the group, first expand the group and Left click on the Layer and hold down the Left mouse button and drag the Layer outside the group. Release the Left mouse button when you are happy with your placement.

Renaming Groups:
Just like layers, you can DOUBLE Left click the group text name to change the name of the group.
Deleting Groups:
If you no longer need the group, you should delete the group by following these steps.
| | A). Right click the text of the group. |
| | B). Left click the “Delete Group” command from the menu. |

You will now see the following dialog box.
| | A). You must be very careful with “Group and Contents” because if you have layers inside this group it will remove them. Left click this button to delete the “Group and Contents”. |
| | B). On this example, please Left click the “Group Only” button. |
| | C). If you do not want to delete the group, Left click the “Cancel” button. |

Flatten Image:
When you are 100% done with your image, you then can flatten the image. By flattening an image, it makes it 1 layer and it will be considered the “Background” Layer and if you are working with transparent layers, it will make it a white background.. Left click the “Layer” menu and Left click the “Flatten Image” command.

If you have hidden layers, you will get the following dialog box displayed. This is telling you that if you flatten the image, you will lose any hidden layers. Left click the “OK” button to discard the hidden layers. If you would like to turn on the hidden layers or you do not want to flatten the image, Left click the “Cancel” button.

Conclusion:
Over the last 2 tutorials we have discussed most of the basic features of “Layers”. The first tutorial was to get your feet wet and this tutorial was to add on to your knowledge. In this tutorial you should have learned how to change the color identifier, copy from one image layer into another image, 2 different methods on creating new layers, grouping layers, and even how to flatten the image.
We recommend that you a take a minute and answer the 10 question quiz below to see how much knowledge you have learned in this tutorial.

1). What is one way to create a blank new layer?
| | A). From the “Edit” menu, move your mouse to the “Layer” command and then select “New Layer”. |
| | B). Left click the”Create a new layer” icon located to the left of the trashcan in the layers palette. |
| | C). Left click the “Blank Layer” command located in the Layers menu. |
| | D). If it is a text layer, Left click the “T” and then use CTRL-“J” to create a blank layer. |
2). How do you change a color identifier in the Layers palette?
| | A). You only can create a color identifier when you create a new layer. |
| | B). Left click the Layer and then Left click the color palette and select a color. |
| | C). Left click the Layer and the in the “Layer” menu, Left click “Change Color”. |
| | D). Right click the image of the Eye in the layer palette and then Left click the color. |
3). How do you add to a Layer Group?
| | A). Hold down the Left mouse button and drag the layer into the group name. |
| | B). Right click the layer and select “Add to group layer”. |
| | C). Right click the group layer and select “Add to group layer” option. |
| | D). Left click the group layer and a dialog box will give you an option to add to the group. |
4). What is one way to delete a Group in the Layers Palette?
| | A). Use the “Delete Group” icon in the layer palette. |
| | B). Left click the group name and from the “Layers” menu, select “Delete Group Only”. |
| | C). Right click the group name and Left click “Delete Group”. |
| | D). Drag the group to the “Delete Group” option in the layers palette. |
5). What happens when you use the command “Flatten Image”.
| | A). It compresses the file image size down so you can view it on the web easily. |
| | B). It only compresses the one layer when selected. |
| | C). It allows you to change the layers perspective to flatten the image so it sits flat. |
| | D). It converts all layers into 1 background layer and converts a transparent layer into a white background. |
6). How do you expand the Groups to be able to see the Layers in that group?
| | A). Left click the down arrow next to the image of the folder of the layer group. |
| | B). It only compresses the one layer when selected. |
| | C). Left click the layer group and then use CTRL-“+” to expand the group. |
| | D). Left click the layer group and then Left click the “+” button. |
7). What is one way to rename the group name in the layers palette?
| | A). Left click the group and Left click the “Rename Group” button. |
| | B). Left click the group name and use the “Rename Groups” in the Layers menu. |
| | C). Left click the group name and use CTRL-“R” to rename the group. |
| | D). Double Left click the group name. |
8). There are 2 methods we showed you on how to create a new blank layer, which method allows you to change the opacity of a layer when creating it?
| | A). Left click the “Create a new layer” icon in the Layers palette. |
| | B). In the Layers menu, move your cursor to “New” and then Left click the “Layer” command. |
| | C). Use “Shift”-CTRL-“L” to create a new layer with an opacity. |
| | D). You only can change the opacity after you created a new layer. |
9). How do you get 2 different image files side by side in 2 different windows?
| | A). Open the 2 files and Left click the “Window” menu and move to the “Arrange” option and then Left click the “Side by Side” command. |
| | B). Open the 2 files and Left click the “Window” menu and move to the “Arrange” option and then Left click the “Tile” command. |
| | C). Open the 2 files and Left click the “Window” menu and then Left click the “Tile” command. |
| | D). Open the 2 files and Left click the “Window” menu and then Left click the “Side by Side”. |
10). What will happen if you try to use the “Flatten Image” command if you have a hidden layer?
| | A). It will flatten the hidden layer with the rest of the layers. |
| | B). It will disregard the hidden layer and only flatten the visible layers. |
| | C). The visible layers will be flattened and the hidden layer will remain on its own layer. |
| | D). A dialog box will be displayed asking you to “Discard Hidden Layers?” |
Answers: 1). B, 2). D, 3). A, 4). C, 5). D, 6). B, 7). D, 8). B, 9). B, 10). D
Scoring:
0 - 5 = Please review the video tutorial and re-read this document either offline (PDF) or online.
6 – 8 = We would recommend that you print this document off and read it at a later time.
9 – 10 = Congratulations you have passed the quiz. Go ahead and view another tutorial on our site.
We hope you enjoyed this detailed tutorial. Please visit us at: http://www.Photoshopeducation.blogspot.com to expand your knowledge within Adobe Photoshop.
Click Picture To Download Video File To View Offline
Download Total Video Player, iTinySoft
Click Picture To Download PDF Tutorial
Download Adobe Reader, Adobe Corporation
Click Picture To Download Supporting Files
(Brushes, Textures, Fonts, Images, Actions, .PSD, Etc.)
Download ZipGenius Standard Edition 6.0.3.1150, Dicono di ZipGenius


