Summary:
In this tutorial we will show you how to use the different features of the Paint Brush and the Pencil tool. By the time you are done with this tutorial you will also be able to select a color to use in your image from many different ways (picking the color from an existing image, using numeric values to find your color, etc.). While we proceed through this tutorial we will show you tips and tricks such as how to undo your work if you make a mistake (yes, we all make mistakes). Let’s get started!
Currently we are using Windows XP and the Photoshop CS4 Extended version.
Knowledge You Need to Know:
In previous tutorials, you learned how to create a new canvas, adding a palette, what is the toolbox and how to change the toolbox to 2 columns. If you are unfamiliar with these areas, we would recommend that you review these tutorials first before proceeding with this tutorial.
All You Need To Know About Colors:
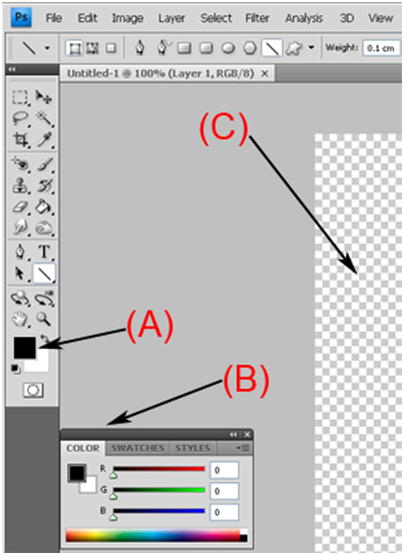
First, create a new document 800 X 800 (pixels) with a transparent background. Next, make sure you have the colors palette open. You should see a document similar to the one below.
A) The first area we will be discussing on how to change the color is the foreground color which is the black color in the picture. Now Left click the black box (foreground color). | |
| B) You should have the color palette displayed. In this example we have moved the palette to the Left side, but yours could be located on the right hand side of the screen. | |
C) You should have a transparent document (checkerboard style tells you it is transparent) and it should be set to 800 X 800 in size. |

If you Left clicked the foreground color, you should see the following screen displayed. There are many ways to select a color and a lot of options within the color dialog box that we will not be covering in this tutorial. This tutorial was created so you get a good understanding of the color dialog box.
A) Move your mouse and pick a shade of a color by Left clicking the color. You will notice Photoshop will put a circle around the color. | |
| B) Left click the hue color bar to change the actual color. | |
C) When you click on a color it will be displayed in this box. It will also show you the current color (currently red). |

Here are the rest of the important options within the foreground color dialog box.
A) If you are creating a new image for the web only, Left click the “Only Web Colors” check box. You will notice the colors change. We recommend that you keep this box unchecked. | |
| B) One of the nice features of Photoshop is once you found a specific color; you can always reuse that exact color again by entering this numeric value. Left click on this text box and enter your color number. On the example below the number is: “91ece7”. | |
C) When you are finished, Left click the “OK” button. |

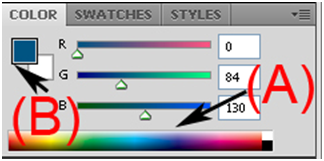
The color palette allows you to change the color quickly while working on your image. You will notice when you change the color in the color palette box, it will also change the color the color in the toolbox.
A) Select a color from the hue bar by Left clicking the color. | |
| B) Besides displaying the color in the toolbox, it will also display the color that you have in the palette. |

Instead of using the Hue color bar to select the color, you can use the following options.
A) You will notice slider bars for the “R” (Red), “G” (Green), and “B” (Blue). Use these slider bars by Left clicking the correct color within the bar. | |
| B) When you make changes to the color, you will notice these 3 boxes values will change. You can fine tweak the color by editing the values in these boxes. Left click the box to change the value. |

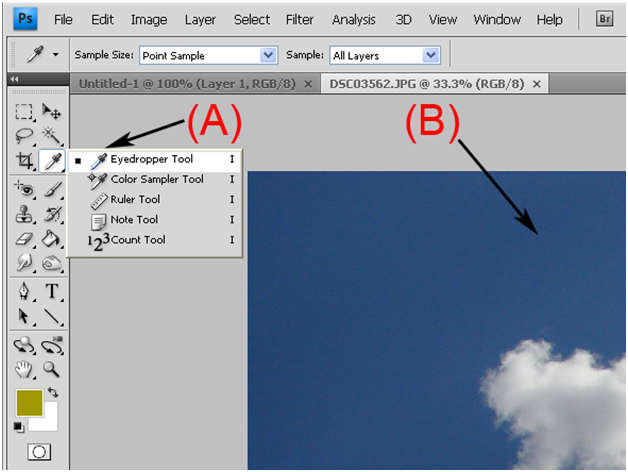
Now that we have showed you a few different ways to change the color, let’s open up any image you have stored on you system. Once open an image, you should see you have 2 tabbed windows. 1). The original 800 X 800 blank canvas window and 2). An image you have opened from your computer. If you have no images on your computer, feel free to download the “Sky” image which is located at the bottom of the blog post “Ready, Set, Save” (click on the supporting files image).
A) Right click the 3rd tool down on the right hand side in the toolbox. You should see a sub-menu popup with an “Eyedropper Tool” command. Left click the “Eyedropper Tool” command. If you do not see the “Eyedropper Tool” in the toolbox, then change the toolbox to a 2 column display. | |
| B) Move your Eyedropper Tool to a color in the image. Once you have located the color, Left click the color in the image. You will now see the foreground color change. |

Understanding The Brush Tool:
With the color changed, Left click on the 800 X 800 blank canvas tabbed window. Now it is time to have fun with the “Brush Tool”.
A) Right click the “Brush Tool” (4th tool from the top on the right hand side). You should now see the sub-menu and Left click the “Brush Tool” command. | |
| B) Move your mouse cursor to the empty canvas area and hold down the Left mouse button and drag. Now release the Left mouse button. Feel free to change the color and play around with the brush tool. Photoshop Tip – You can use the keyboard shortcut of “B” to select the active “Brush Tool”. |

You will now notice that once you have selected the “Brush Tool” it brings up the options bar located underneath the menu options.
A) Left click the drop-down box arrow to display some of the brush settings. To hide this additional information, Left click the drop-down box arrow again. | |
| B) The “Master Diameter” is the size of the brush. Either enter the numeric value in the box or use the slider by holding down the Left mouse button on the slider and moving it left or right. Release the Left mouse button to select the diameter. Photoshop Tip – When working on the canvas, you increase or decrease the size of the brush by using the keyboard shortcut “]” (Increase) or “[“ (decrease). | |
| C) The “Hardness” is a simulation of the amount of pressure you would be pushing down to use this brush. If the bar is located to the left of the screen, then it tells Photoshop to use more soft blurred pressure (the example below in the canvas is a soft pressure). If the bar is pushed to the far right side then that means Photoshop will use a hard pressure. | |
D) The last option is for you to select a preset. Just double Left click the preset to use this brush. In later tutorials we will be discussing how to add your own brushes to the presets. |

Here are 2 more options that are important for the “Brush Tool”.
A) We will be going over all blending modes that are displayed in this drop-down box in a future tutorial. For now, play around with the “Mode” and you will see how each “Mode” changes the brush tool. | |
B) The “Opacity” is the amount of transparency of the brush. If you lower the “Opacity” and you use the brush on top of an existing color on the canvas, you will notice some of the other color begins to bleed through. Left click the right arrow to change the percentage or Left click in the box and enter a value. |


Quiz
1). How do you select a color from an open image?
A). Open the color dialog box and write down the 6 digit value and then use that value. | |
| B). Use the “Eye” tool and Left click on the color in the image. | |
| C). Use the “Eyedropper” tool and Left click on the color in the image. | |
D). Use the “Eyedropper” tool and Right click on the color in the image. |
2). When selecting a color for only to be used on the web, what box should you select?
A). In the foreground color dialog box, select “Web Use Only”. | |
| B). In the foreground color dialog box, select “Only Web Colors”. | |
| C). Left click the right arrow next to the “Preset” button and select web only. | |
D). There is no option in Photoshop to limit your colors to web only. |
3). The color palette main purpose is?
A). Change the color without opening the foreground color dialog box. | |
| B). Displays only the current color. | |
| C). Allows you to change the “Channels” for the red only. | |
D). Shows you a picture of a color swatch. |
4). The keyboard shortcut to undo?
A). CTRL-“U”. | |
| B) ALT-“U”. | |
| C). CTRL-“Z”. | |
D). “U”. |
5). What is the keyboard shortcut to select the brush.
A). CTRL-“B”. | |
| B). ALT-“B”. | |
| C). <F5>. | |
D). “B”. |
6). Within the brush options bar, you click this to allow you to make changes to the brush?
A). The right arrow next to the image of the brush. | |
| B). The Left arrow next to the image of the brush. | |
| C). The down arrow next to the image of the brush. | |
D). The up arrow next to the image of the brush. |
7). The opacity in the options bar does what?
A). When you add a new color over an existing color, it will show a part of the color of the bottom color. | |
| B). This will change the size of the brush. | |
| C). This will change the flow of the brush. | |
D). It turns your brush into an airbrush similar to the airbrush at an amusement park. |
8). To increase or decrease the size of a brush, what keyboard shortcuts should you use?
A). CTRL-“-“ and CTRL-“+”. | |
| B). ALT-“-“ and ALT-“+”. | |
| C). “[“ and “]”. | |
D). “,” and “.”. |
9). To increase the “Hardness” of a brush, you use this?
A). Use the hardness option in the brush options and push the slider to the right. | |
| B). Use the hardness option in the brush options and push the slider to the Left. | |
| C). In the brush options, Left click “Hardness” check box. | |
D). In the brush options, Left click the “Hardness” drop-down box. |
10). One easy way to reset the foreground/background colors to the defaults is?
A). Left click the “File” menu and then Left click “Reset Colors”. | |
| B). Use the keyboard shortcut of CTRL-“D”. | |
| C). Left click the color and change it to black or white. | |
D). Use the “D” key to reset the colors. |
Answers: 1). C, 2). B, 3). A, 4). C, 5). D, 6). C, 7). A, 8). C, 9). A, 10). D
Scoring:
0 - 5 = Please review the video tutorial and re-read this document either offline (PDF) or online.
6 – 8 = We would recommend that you print this document off and read it at a later time.
9 – 10 = Congratulations you have passed the quiz. Go ahead and view another tutorial on our site.
We hope you enjoyed this detailed tutorial. Please visit us at: http://photoshopeducation.blogspot.com/ to expand you knowledge within Adobe Photoshop.

Click Picture To Download Video File To View Offline
Download Total Video Player, iTinySoft


0 comments:
Post a Comment